
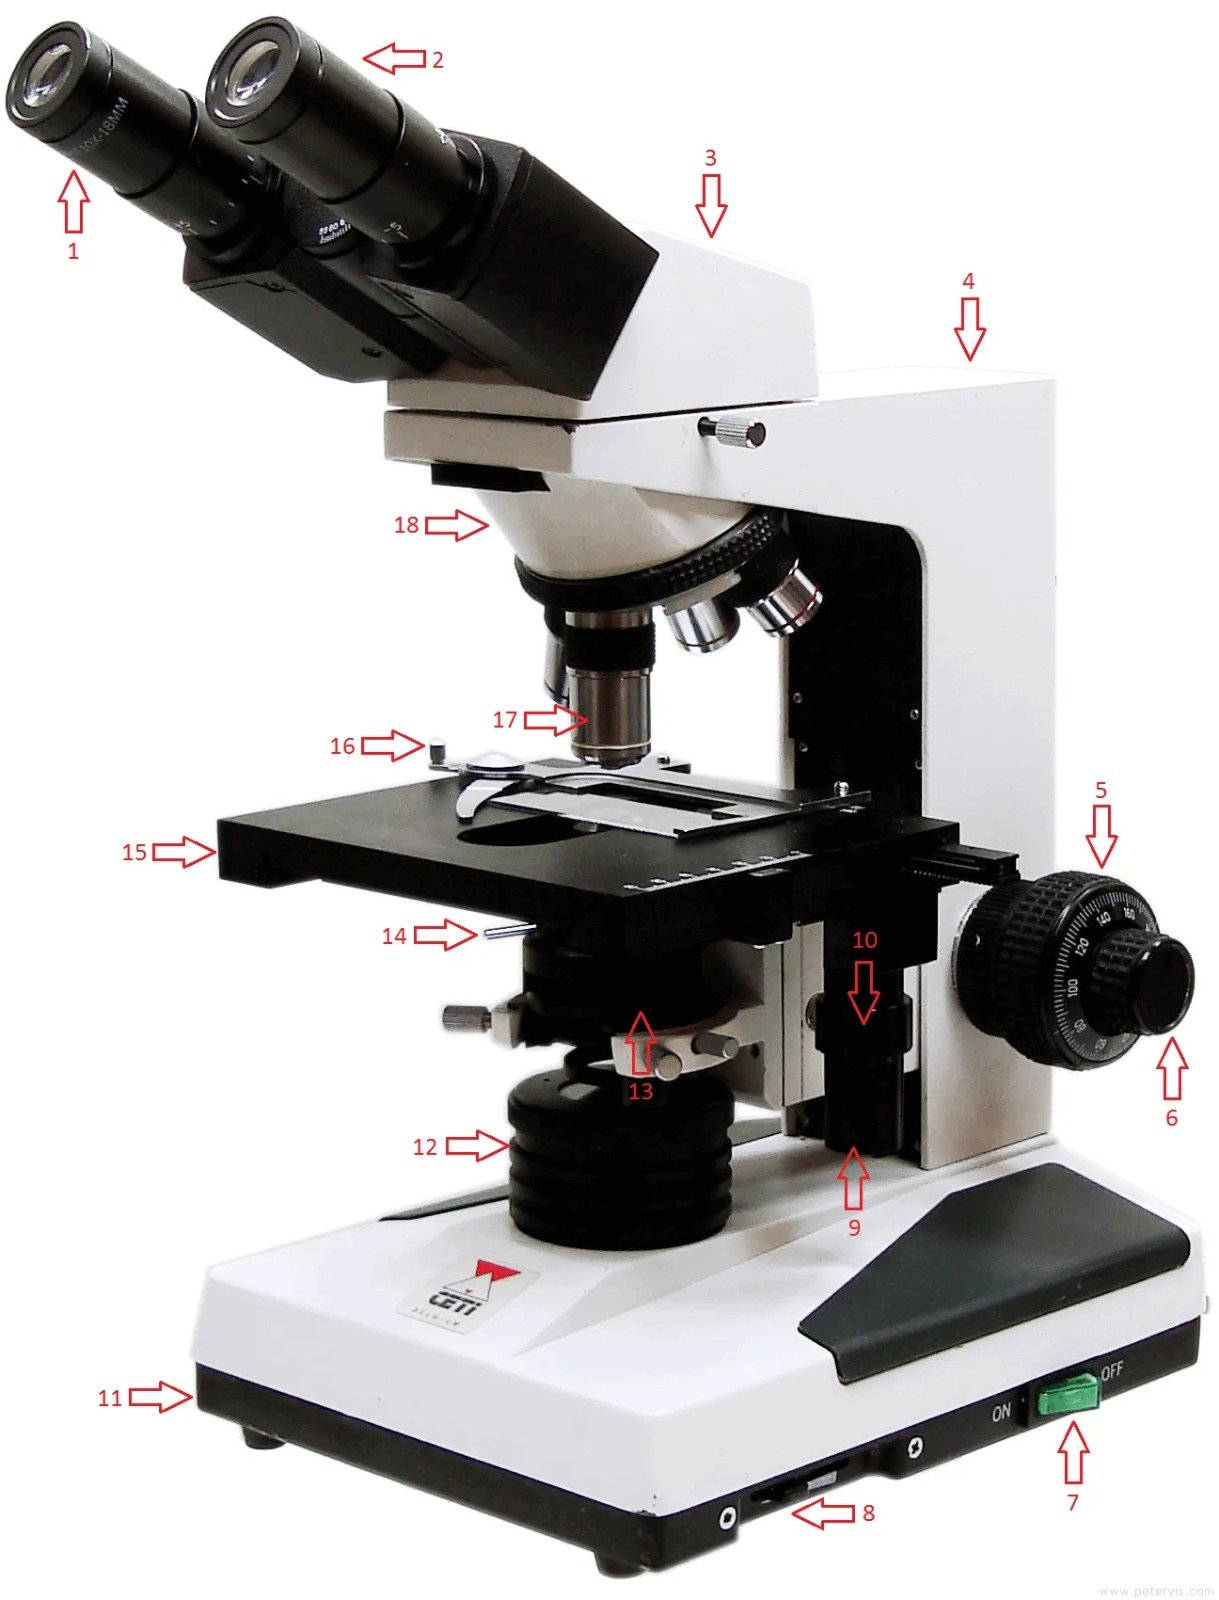
A microscope labeled diagram is one of the best learning tools for students, teachers, and science enthusiasts. It helps identify each component of a microscope and explains how every part contributes to magnifying tiny objects that cannot be seen with the naked eye.
Whether you’re preparing for a biology exam, working in a laboratory, or simply curious about how microscopes work, understanding a microscope labeled diagram makes learning much easier.
What Is a Microscope?
A microscope is a scientific instrument used to magnify very small objects, such as cells, bacteria, tissues, and microorganisms. It allows scientists and students to observe details that are invisible without magnification.
Modern microscopes are used in:
- Biology laboratories
- Medical research
- Schools and universities
- Hospitals
- Forensic science
- Industrial quality control
Why Is a Microscope Labeled Diagram Important?
A microscope labeled diagram helps users:
- Identify each microscope part.
- Understand the function of every component.
- Learn proper microscope handling.
- Improve laboratory skills.
- Prepare for science examinations.
Many biology textbooks include a microscope labeled illustration because visual learning makes complex concepts easier to understand.
Main Parts of a Microscope Labeled
Below are the essential parts commonly shown in a microscope labeled diagram.
1. Eyepiece (Ocular Lens)
The eyepiece is where you look into the microscope. It usually provides 10× magnification and works with the objective lenses to enlarge the image.
Function:
- Magnifies the image for viewing.
- Provides comfortable observation.
2. Body Tube
The body tube connects the eyepiece to the objective lenses while keeping the correct distance between them.
Function:
- Aligns the optical components.
- Maintains image clarity.
3. Revolving Nosepiece
The revolving nosepiece holds the objective lenses and rotates to switch between different magnification levels.
Function:
- Allows quick lens changes.
- Supports multiple objective lenses.
4. Objective Lenses
Objective lenses are the primary magnifying lenses of the microscope.
Typical magnifications include:
- 4× (Scanning)
- 10× (Low Power)
- 40× (High Power)
- 100× (Oil Immersion)
Function:
- Provides different levels of magnification.
- Produces detailed images.
5. Stage
The stage is the flat platform where the microscope slide is placed.
Function:
- Holds the specimen securely.
- Allows precise positioning.
6. Stage Clips
Stage clips keep the microscope slide from moving during observation.
Function:
- Prevents slide movement.
- Improves viewing accuracy.
7. Condenser
The condenser focuses light onto the specimen.
Function:
- Concentrates light.
- Improves image brightness.
8. Iris Diaphragm
The iris diaphragm controls how much light reaches the specimen.
Function:
- Adjusts brightness.
- Enhances image contrast.
9. Illuminator (Light Source)
Most modern microscopes have a built-in LED or halogen light.
Function:
- Illuminates the specimen.
- Makes observation easier.
10. Coarse Adjustment Knob
The coarse adjustment knob moves the stage quickly for rough focusing.
Function:
- Provides initial focus.
- Used mainly with low-power objectives.
11. Fine Adjustment Knob
The fine adjustment knob allows precise focusing.
Function:
- Sharpens the image.
- Essential for high magnification.
12. Arm and Base
The arm supports the microscope’s upper components, while the base provides stability.
Function:
- Supports the microscope.
- Makes carrying safer.
- Keeps the instrument balanced.
How to Read a Microscope Labeled Diagram
When studying a microscope labeled illustration:
- Start with the eyepiece.
- Follow the light path through the body tube.
- Identify the objective lenses.
- Locate the stage and specimen.
- Observe the focusing knobs.
- Find the light source and diaphragm.
- Understand how each part works together.
Learning the diagram step by step makes it easier to remember the parts.
Types of Microscopes
Different microscopes are designed for different purposes.
Compound Microscope
- Most common in schools and laboratories.
- Uses multiple lenses.
- Ideal for viewing cells and microorganisms.
Stereo Microscope
- Produces a three-dimensional view.
- Used for insects, plants, and small objects.
Digital Microscope
- Displays images on a computer or monitor.
- Easy to capture photos and videos.
Electron Microscope
- Uses electrons instead of light.
- Offers extremely high magnification.
- Common in advanced scientific research.
How to Use a Microscope Properly
Follow these steps for safe and effective use:
- Place the microscope on a stable surface.
- Turn on the light source.
- Position the slide on the stage.
- Select the lowest objective lens.
- Use the coarse adjustment knob to focus.
- Refine the image with the fine adjustment knob.
- Switch to higher magnification if needed.
- Adjust the diaphragm for the best lighting.
Always handle the microscope with care to avoid damaging its lenses or mechanical parts.
Common Mistakes to Avoid
Beginners often make these mistakes:
- Starting with the highest magnification.
- Touching the lenses with fingers.
- Using excessive light.
- Forgetting to secure the slide.
- Moving the coarse adjustment knob while using high power.
- Cleaning lenses with ordinary tissue instead of lens paper.
Avoiding these errors helps maintain both image quality and the microscope’s lifespan.
Benefits of Learning Microscope Parts
Understanding a microscope labeled diagram helps you:
- Improve biology knowledge.
- Perform laboratory experiments accurately.
- Develop observation skills.
- Understand scientific research techniques.
- Prepare for school and university examinations.
It also builds confidence when using laboratory equipment.
Frequently Asked Questions
What is a microscope labeled diagram?
A microscope labeled diagram is an illustration that names each part of a microscope and shows where it is located, helping users understand its structure and function.
Why is labeling microscope parts important?
Labeling helps students identify components, understand how the microscope works, and use it correctly during laboratory activities.
Which microscope part provides magnification?
The objective lenses provide the primary magnification, while the eyepiece further enlarges the image.
What is the purpose of the stage?
The stage holds the microscope slide securely while the specimen is being observed.
Which focusing knob should beginners use first?
Beginners should begin with the coarse adjustment knob while using the lowest-power objective lens, then switch to the fine adjustment knob for a sharper image.
Conclusion
A microscope labeled diagram is an essential educational resource for anyone learning biology or laboratory science. By understanding the names, locations, and functions of each part, students and researchers can use microscopes more effectively and gain a deeper appreciation of the microscopic world. With regular practice, identifying microscope components becomes second nature, making scientific observation easier, more accurate, and more enjoyable.
